Thanks for stopping by and I hope you had some time to play around with your papers this weekend as well.
Sunday, May 7, 2017
Monday, May 1, 2017
It's all about the letter
My turn to share something using the beautiful Robin's Nest products and today I picked this fun project of creating a letter for hanging on a wall.
I made this for my beautiful niece to hang in her bedroom. Please check out the tutorial over at Chattering Robin's Blog.
I hope you will try creating a letter for you or someone special in your life. Thanks for stopping by.
Tuesday, April 25, 2017
How to create a beautiful Bigger Bitty Bucket from Whisker Graphics
Colleen here with a pretty girly
project. I saw this Bigger Bitty Bucket
https://www.whiskergraphics.com/bigger-bitty-bucket.html
in the store and I could just see it turned into a sweet little girl
gift.
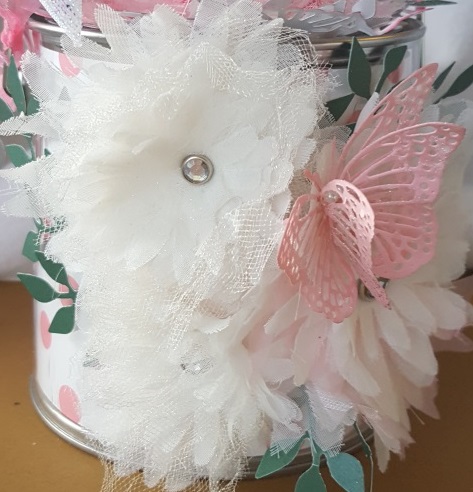
Here is my finished project:
I started with my sizzix dies and cut
out the flowers using material that I had. Once the flowers were cut
out, I layered them in the order I wanted and then misted all the
flowers very well. I twisted the flowers up and held them in place
with a binder clip and left them to dry. I left mine overnight to
make sure they were nice and dry.

While the flowers were drying. I cut
out some vines using a sizzix die. I also cut out a doily using a
Cherry Lynn Die and inked the edges with pink. I also used a Cherry
Lynn die to cut out two butterflies. Since this is for a little girl
I wanted to make sure it sparkled so I added some glitter to make
sure you could see it sparkle. I added a few beads down the center
for the body.

I adhered the doily to the top of the
bucket and used a pop dot to make it stand up. Then I added the
flower on top of the doily.
The next step is to finish decorating
the bucket or if you desire you could leave it with just the flower
on top.
I used the rest of my flowers to add to
the front of the bucket and some ribbons on the handle.
One thing I love about these buckets is
the key is hooked right to the handle which makes it so easy to open.
I had so much fun creating this little
girl pretty bucket. You are so going to want to pick up a few
buckets to create wonderful, easy and beautiful gifts. Thank you for stopping by and for your comments.
Monday, April 17, 2017
Great family photo
My turn to share a project over at Chattering Robin's Blog. Please check out the quick tutorial for how to create this page as well as the products used.
Thursday, April 13, 2017
I love moments like this
My turn to share a challenge over at Creative Inspiration and it is a scraplift challenge. Here is my take on the sketch I picked (not going to show you the page I picked to lift you will have to check it out over at the forum :)
Monday, April 3, 2017
Fun, cute and quick bookmarks for Easter
My turn at Chattering Robin's Blog and I wanted to make something quick, easy and fun so I made a couple of bookmarks. These bookmarks are so easy and fun to make you are going to want to make many different kind of animals.
Please check out the Chattering Robin's Blog to see my tutorial on how to make these. I hope you will share what you make so I can see them.
Saturday, April 1, 2017
A practical and easy Easter name place card you can make
With Easter fast approaching, it is time for me to get going on the Easter name place cards for each person. This year Riley helped me decide on what we were going to make. He picked a cute little lamb from the Silhouette store. Riley and I will be putting these pillow boxes together.
I put one of our pillow boxes together so that Riley will have an example to follow and this is what they should look like when he is all done. I hope you will make some pillow boxes and share them with me. I can't wait to see what you create.
Also I am using this project for the Creative Inspiration Challenge Blog Hop for those that want to play along. You can find the DETAILS HERE
1. Bev http://beeceecreativity.blogspot.com/2017/04/creative-embellishments-april-challenge.html
2. Tracy http://tracysscrappyhideaway.blogspot.com/2017/04/mama-bird.html
3. Phillis http://justfindtimetoscrap.blogspot.com/2017/03/blog-hop-at-creative-inspiration.html
4. Deb P http://tassiedeb.blogspot.com.au/2017/04/creative-inspiration-easter-blog-hop.html
5. Colleen http://scrappingranny-colleen.blogspot.com/…/a-practical-an… YOU ARE HERE
6. Louise T http://timelesscraftmumma.blogspot.com.au/
I put one of our pillow boxes together so that Riley will have an example to follow and this is what they should look like when he is all done. I hope you will make some pillow boxes and share them with me. I can't wait to see what you create.
Also I am using this project for the Creative Inspiration Challenge Blog Hop for those that want to play along. You can find the DETAILS HERE
1. Bev http://beeceecreativity.blogspot.com/2017/04/creative-embellishments-april-challenge.html
2. Tracy http://tracysscrappyhideaway.blogspot.com/2017/04/mama-bird.html
3. Phillis http://justfindtimetoscrap.blogspot.com/2017/03/blog-hop-at-creative-inspiration.html
4. Deb P http://tassiedeb.blogspot.com.au/2017/04/creative-inspiration-easter-blog-hop.html
5. Colleen http://scrappingranny-colleen.blogspot.com/…/a-practical-an… YOU ARE HERE
6. Louise T http://timelesscraftmumma.blogspot.com.au/
Subscribe to:
Posts (Atom)