My first project using products from Whiskers Graphics. How cute, a
little Easter Egg Basket you can make for your table decorations.
How cute would these be sitting at each plate for Easter dinner and
all the different colors you could create.
I started with
one of my Nestability dies to cut the egg shape. I cut 2 shapes from
cardboard, I used my cardboard from cereal boxes and then I cut 1
shape from felt.


Now that you
have everything cut out you are going to glue them together. I glued
the 2 pieces of cardboard together (if you cardboard is heavier than
a cereal box you won't need to cut 2) and then glue the felt on top.
Let this thoroughly dry.
The next step is
to evenly put holes through the felt and cardboard. I found the
easiest way to do this was to use a very small punch. I made my
holes every ½ inch.
Now take plain
everyday toothpicks and put them in the holes. Once you have them
all in the holes standing up straight, add glue to each toothpick.
Adding the glue will make sure they stay in place.
Once
the glue has dried you will start weaving using some of the beautiful
Diving Knots that you can get from the Whiskers Graphics Store
(https://www.whiskergraphics.com/shop-by-product/divine-twine-bakers-twine_).
This twine was so soft and easy to use. You weave just like a
basket weave, over one toothpick around the other toothpick and just
keep going until you have the basket as big as you want. If your
toothpicks went through to the bottom of your egg, no problem just
cut them off with your shears.
Once you have
your basket as high as you want, just cut off the excess toothpicks.
I added a little glue to hold the twine in place.
Now you could
leave your egg basket plain and fill it with candy or you can
decorate the outside and please remember if you are going to put any
kind of food in the basket stay away from glitter.
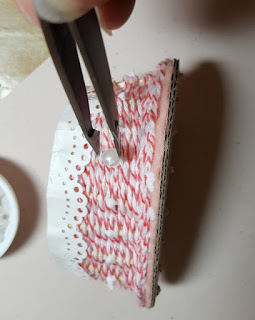
I used a punch
to punch out a border to cover the top of the basket. I put the
border on both the inside and outside of the basket.
I wanted to
cover the edges so you can either trim it up with shears or add
something pretty. I decided to braid some of the beautiful twine and
glue it along the edges.
To finish off my
egg basket I added some dew drops (The Robin's Nest store) around the center and flowers to
the front.
I hope you give
this fun and easy Easter Egg Basket a try.


4 comments:
This is so brilliant..love this...thanks for sharing the tutorial :) BL
OMG super cute.. great idea and fab project
WOW! that is a wonderful idea! - BL
Wow....that is amazing! So CUTE!! BL
Post a Comment